Bibliographic Networks: A Python Tutorial

Networks can provide significant measures to identify data driven patterns and dependencies. Though, given a data file it can be difficult to discern how one may approach creating such a network. In this tutorial, we will use a bibliographic data file downloaded from a query search in Scopus to walk through the process of cleaning the data file, writing a python script to parse the data into nodes and edges, computing graphical measures using NetworkX, and creating an interactive network display using HoloViews.

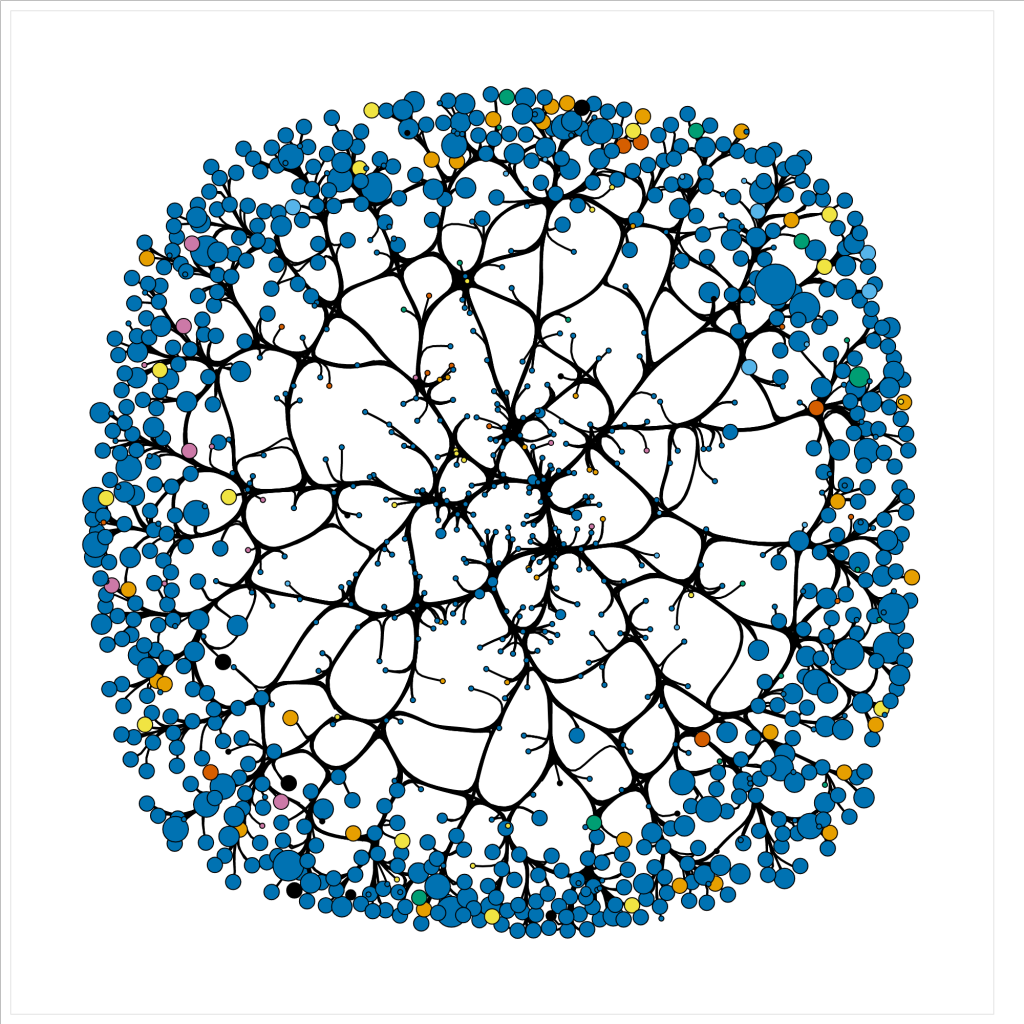
We tried out multiple Python libraries for ease of use and efficiency before landing on this combination. Building a network was more intuitive in NetworkX than iGraph. However, it took several minutes to render our large graph and a interaction was sticky. Pyvis was easy to build a network with and can be expanded to incorporate more advanced NetworkX functionality with only a couply lines of code. However it still took a long time to render, with slow manipulation. Holoviews, which runs on top of the native Python visualization library Bokeh, enables NetworkX to render quickly, with versitile manipulation. The graphs are produced in HTML and JavaScript for easy integration into webpages.

About Colaboratory

While we originally developed this script in a local notebook, we found that running it through Google’s cloud-based Jupyter notebook environment Colaboratory is a smoother option, particularly for nacent coders. We encountered version conflicts between the dependencies when setting up a local notebook environment that were bipassed in Colab. Colaboratory allows you to use and share Jupyter notebooks from your browser, without having to download, install, or run anything on your own computer. Notebooks can be saved to Google Drive, Github or downloaded locally. This code contains OAuth2 functionality to access data from Google Drive, with a link to instructions for access from Github. A single line of code adapts the script render in Colab.

To open the notebook in Colab, click on the notebook from the repository list. GitHub will open a preview, click this iconImage of Logo from the top of the notebook to open directly in Colaboratory. (If the preview doesn’t load, you may have to disable your ad blocker.) Alternatively, you can clone or download this repository and put in Google Drive. Google Drive will recognize the .ipynb notebook file format and give you the option to open in Colaboratory.

Using Processing to Visualize Space Exploration

(Read Time: About 3 Min.)

The Challenge:

Could the total distance traveled by a NASA space shuttle have reached Mars? How far did each shuttle go in relation to our solar system? As an inaugural project to get our digital projects studio thinking and managing a project, we used a dataset that recorded the distance traveled by each space shuttle launch from 1981 – 2011 and worked to visualize the total miles traveled for each shuttle as a hypothetical race to the red planet.

Continue reading “Using Processing to Visualize Space Exploration”

From Networks to Scrapbooks: A Case Study of Data Visualization Consulting (Part 2)

Part 2: Writing and Visualizing the Data Narrative

In contrast to the tens of thousands of records associated with the collection as a whole, the Bentley Student Scrapbooks consists of 88 scrapbooks documenting student experiences at the University of Michigan spanning the 1860s to the 1940s, with most scrapbooks falling between about 1906 to 1919. These scrapbooks covered a fascinating cross-section of life on campus – everything from student athletics to cross-dressing to secret societies to dance cards appeared in the Subjects field of the metadata.

When I asked the (admittedly naive) question “what do you mean by scrapbooks?” the archivist team had a lot of stories to share. For instance, I had no idea that a fraternity in 1910 might keep track of their beloved top athlete in painstaking detail and then put it all into a scrapbook for posterity. It was genuinely lovely to experience their enthusiasm about this collection, which often focused on specific backstories to the creation or legacy of these scrapbooks that fell outside the metadata itself. How then, I wondered, might a data visualization narrative support these passionate archivists in their public lectures and workshops? What types of patterns should we focus on revealing? Continue reading “From Networks to Scrapbooks: A Case Study of Data Visualization Consulting (Part 2)”

From Networks to Scrapbooks: A Case Study of Data Visualization Consulting (Part 1)

Part 1: Finding the Story in Data

Introduction

When you set out to tell a story with data, how do you determine its scope and focus? What kind of relationship do you want to cultivate between your viewers and the data being visualized? If there is a “best” or “most effective” story lurking in the data for the audience at hand, how do you pick it apart from the others?

Data visualization refers to a set of tools and practices, but also a deeper struggle to find a way to craft meaning from representations of reality, and share that meaning with others via narrative. In this post, I’ll explore how I grappled with identifying and framing a data visualization story in the context of a semester-long consulting project with the Bentley Historical Library.


The Bentley

According to the Bentley’s website:

The Bentley Historical Library collects the materials for and promotes the study of the histories of two great, intertwined institutions, the State of Michigan and the University of Michigan. The Library is open without fee to the public, and we welcome researchers regardless of academic or professional affiliation.

The Bentley is home to a massive, diverse trove of items spread across 11,000 collections. When the Bentley reached out to the Digital Project Studio last fall, they had a central goal in mind: helping researchers understand the collections better, and engage with these collections in ways beyond the affordances of simple keyword searches or browsing alphabetical lists. They hoped data visualization could provide something special to spur that process – a new kind of insight or way of interacting. Continue reading “From Networks to Scrapbooks: A Case Study of Data Visualization Consulting (Part 1)”

Introduction to Mapping in R

One of the goals of the Digital Project Studio is to develop a set of helpful materials for people interested in various visualization tasks. Part of working towards this goal is cleaning up some already existing notes for in person workshops into usable standalone tutorials.

This workshop is designed to introduce you to some of the geospatial packages that can be used in R through a series of examples. It requires some experience with either the R language or with working with geospatial data. All the data necessary are provided in the download links at the top of the workshop page. The instructions are both on this webpage and in a pdf named script_markup.pdf in the downloaded files.

Mapping R Workshop

If you are interested in how we made the instructions for this workshop, check out our blog post:

Creating R Tutorials Using RMarkdown: Code Chunk Options


Reflections on Learning Data Visualization – Digital Projects Studio Year 2

The second cohort of data visualization interns are off and running here at the Digital Project Studio. They will be sharing the projects they are working on very soon. But, as they are getting up to speed, I want to take a minute to reflect on learning about data visualization and technology in general. Recently, in our Tech and Texts seminar series, we read some selections of Wilkinson’s The Grammar of Graphics (an interesting book which formed the basis for the R plotting library ggplot). He begins with an insightful reflection on the difference between graphics and charts:

Continue reading “Reflections on Learning Data Visualization – Digital Projects Studio Year 2”

Once More, With Feeling: Draws and Drawbacks of Sentiment Analysis

Our Project

Opinions tend to reflect feelings as well as beliefs. Sentiment analysis, also known as opinion mining, is a technique used today for generating data on trends in people’s attitudes and feelings on anything from products and services to current events. This data is created by calculating sentiment scores using what people have said or written. Despite the efforts of computer scientists, semanticists and statisticians to figure out ways to program computers to identify the feelings expressed in words, the technique of sentiment analysis is still at best only reliable as a starting point for closer readings.

The results of sentiment analysis can quickly become misleading if presented without any reference to the actual passages of text that were analyzed. Nevertheless, it is helpful as a technique for delving into large corpora and collections of unstructured texts to capture trends and shifts in sentiment intensity.

For a final collaborative project of the academic year 2015-2016, our team at the Digital Projects Studio decided to take on the challenge of visualizing the intensity of emotions and opinions expressed during the 2016 primary election debates. (Click here to see the final product). Our dataset was a set of complete transcripts for twelve Republican and eight Democratic debates. To process the data, we filtered out interventions of moderators and interjections from the audience, ran the statements of each candidate through a sentiment analyzer from Python’s NLTK (Natural Language ToolKit) library, and indexed the statements of each candidate by debate number, numeric sentiment score, and sentiment category.

Continue reading “Once More, With Feeling: Draws and Drawbacks of Sentiment Analysis”

Creating Bar Chart using D3

D3.js is a JavaScript library for creating data-driven documents. D3.js helps to visualize data using HTML, SVG, and CSS.This interactive visualization, makes it easier to communicate stories about data. In this blog, we will cover the basic of

In this blog, we will cover the basics of creating a bar chart using a given set of data in D3.js.

What will you need:

  1. MS Excel – to create a csv file
  2. A text editor like Sublime text
  3. XAMPP

Step 1: Create CSV file

Prepare some sample data in excel and save it as a CSV file.  Here is some unemployment data for the US in the month of Jan from 2005 to 2015

1

Here, Year and Jan – headers for the two columns will act as properties of data when you bring it in.

Step 2: Create HTML file

Here is the basic template to start off your HTML file. Make sure to save this HTML file in the same folder as your CSV file.

[gist https://gist.github.com/noureend/a4687f25d5c0021d63ad]


Step 3:

In order to do this, you will want to do this on a server as most browsers won’t render it. I am using XAMPP.

The function to fetch the data to D3 is:

[gist https://gist.github.com/noureend/3af22c1e6f00bee9d12c]


Because our data is in a csv file, we call d3.csv. If your data is in json format you could call d3.json.

Then, we specify our arguments.

  • The first argument is the path to the data file. Since, my data file is in the same folder as the HTML file, I can just specify the name of the data file.
  • The second argument is a callback function.

Step 4: Create a SVG container

We specify the basic size of our SVG container using the attr function

We create a variable called canvas which then becomes a shortcut for calling the code on the right of the equal to sign.

[gist https://gist.github.com/noureend/2967002b5eac58921e13]


Step 5: Creating Bars

It’s now time to add our bars for the bar graph.

[gist https://gist.github.com/noureend/38e6f123a9a0cbd8e3e1]


We refer back to the data that we created earlier as an argument to our callback function. Which in turn references the data stored in our file.

Next, using the enter method we will append a rectangle for each data element and give it some properties (width, height, y position, and color).

You will notice that the width and y position are functions. The reason for this is you want to specify which data property you are referencing with the ‘d’ variable. The “* 10” multiplies the data by 10 and the bars get bigger.

For the ‘y’ attribute is a function of the index. We want to return the index for each data element, then times it by 50.

Step 6: Adding text to the bars

[gist https://gist.github.com/noureend/0c4c53d728117cc6a90c]


To add text, we will append “text”, specify the color of the text. The most important thing here is perhaps the ‘y’ attribute. You want the text of each bar to the at the same position as the bar so that you can see which text belongs where. Therefore, similar to the above, copy the ‘y’ attribute (vertical position for the text).

Lastly, you want to specify what text you want to have. So, let the text property be a function of data and return the ‘Month’ property.

Now, open the file in your browser and you should see this:

7