
Introduction
A recent project I’ve been working on in the Digital Projects Studio has been moving a website built in PHP to Django. To understand why we’d go through the headache of moving the site into Django it’d be good to first understand some of the scope of the project.
The Project Scope
The project we took on is used as a learning tool in the classroom. As the classes change and research progresses each year, the website needs to be flexible enough to handle structural changes that allow for multiple learning formats such as audio, visual, and imagery. Django has a flexible modeling system that can be updated and changed which was part of the reason for the switch.

Secondly, the tool for students needed to encourage exploration. This meant that the website couldn’t be created in a ‘linear’, story-like manner, and instead needed to encompass different ways of consuming the learning material. These different areas of the site, which highlighted varying aspects of the project, needed the capability to grow without the nuisance of having to find a coder every time a new media type like a video, image, or audio would be uploaded. Django allows for the creation of an admin panel that can serve as an easy way to upload content interface.

Lastly, the project had a massive database already set up within SQL. Switching to Django was not difficult in that the database could be hosted in the same place it was before and only required a couple of changes to the code in the Settings.py file (see below for details).

Backend Changes to Migrate from PHP to Django
Change Your File Extensions
Change your files from .php to .html files immediately. Django won’t run your PHP code, so making these changes will help you understand a couple of things:
- What will no longer work once the PHP is removed. This will be what you’ll have to reprogram in Javascript or Django.
- Making the changes immediately will ensure that all the file endings are consistent. A mix-bag of .php and .html files wouldn’t provide good functionality.
Here’s a great article that shows you how to change your file extensions (on a mac or pc) if you’re unsure what I’m talking about.
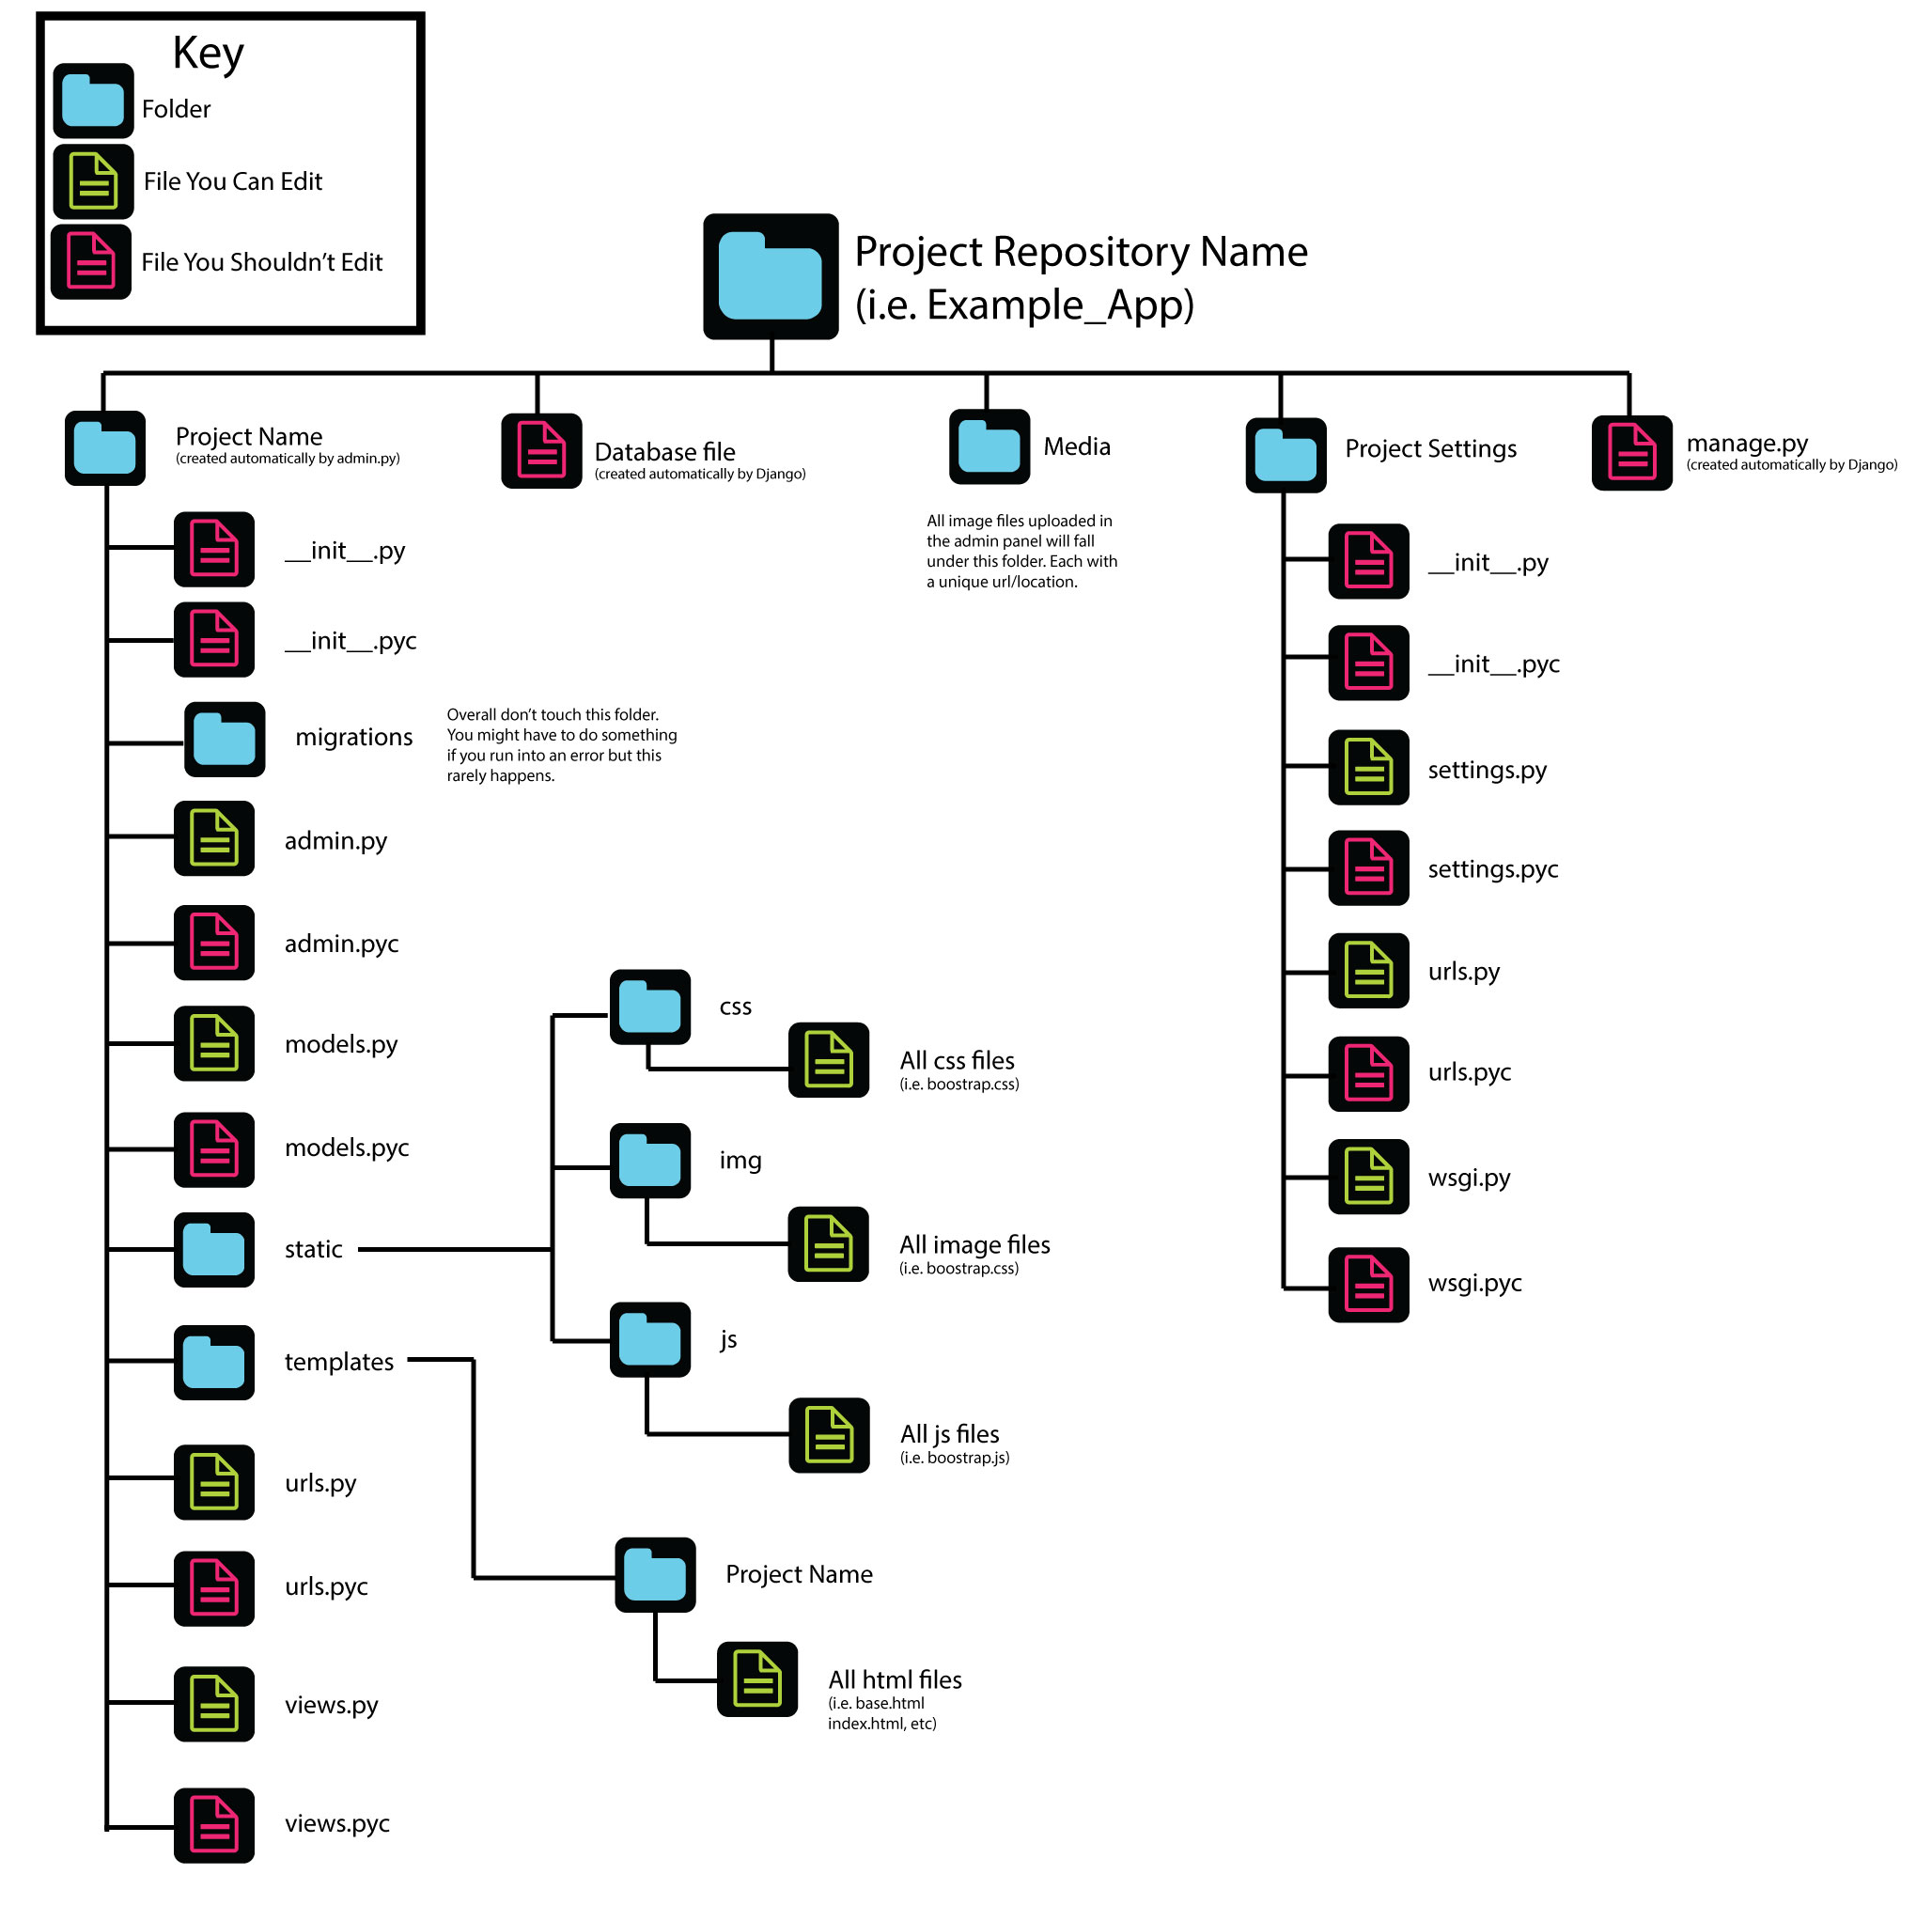
Organize the File Structure
Start off on the right foot by organizing your files correctly. Organizing your files will help ensure that the new site functions properly and also that you can easily find the snippets of code that need editing. If your project is like mine when I received it, then all of the files are in “disarray” as compared to Django’s strict filing structure. For example, there were multiple css files in different levels of the file hierarchy, no static or template files created, etc.
To transfer all the files correctly to Django structure, your new file tree should look like the following:
Creating the Model & Adding Data
To get Django up and running you’ll have to create a new model based off of the data structure. As an example, the database I used had several venues in it. To get all the data from the past model on Venues, I created a class called ‘venues’ and added in each of the components (i.e. headers at the top of the Excel/csv file) of that overall class such as venueName, venueType, venueCity, venueCountry, etc. If you’re unsure on how to update the model or what to change in the code, check out this blog post.
Once the model is created you have two options to get the data into the model. One is that you can make SQL queries to migrate the data over. The second, more laborious way, is that you can add in all new data manually through the Admin interface. The first way is faster but you have to be careful. Make sure to back up your database before starting and consult someone who has migrated databases before so you don’t lose your data.
Final Settings.py Adjustment
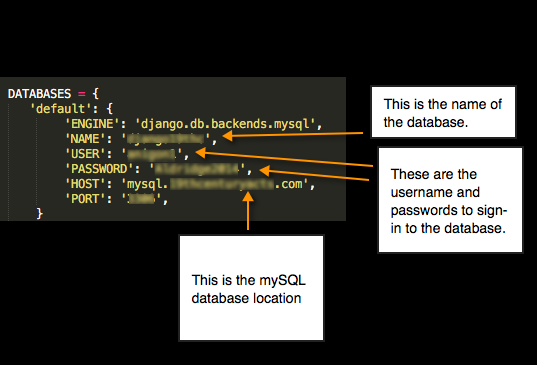
The final step on the backend is making sure that the new Django application and the data are talking to each other. This step is done in your settings.py file. The database for this project is located in a remote server so parts of the settings.py file had to be changed. Below is how the urls are structured.
![]()
The Media Root goes to the development server. The Media_URL goes to the media folder on the development server because that’s where media (like images, videos, audio, etc) are added when the Administrator uploads new media.
To update the code so that it’s pointing to the database, see the code below on what to adjust.
Creating url.py and view.py Pages
When transferring data from PHP to Django you’ll need to create several files, such as the static and template folder highlighted above, and files that didn’t exist before in your file heirarchy such as the urls.py and views.py.
Django works through a model-view-controller so when you create these files then you’re adding in the part that the user sees (the view for the views.py file) and what happens when they click (the controller or the urls.py file). This post goes further into the details if you’d like to learn more.

Front End Changes to Migrate from PHP to Django
Consolidating Code
One of the great parts about Django is being able to consolidate your code into different files, the same way you can do this in PHP too. Creating code blocks in Django can help make large projects more manageable. In Django you can put all the header and footer code in the base file and then extend the base file. An example of this code can be seen below. Read the comments in the code for more details.
{% load staticfiles %}
<!--Load static files will bring in all the css, images, and js files-->
<html>
  <head>
  	<meta charset="utf-8">
    <meta http-equiv="X-UA-Compatible" content="IE=edge">
    <meta name="viewport" content="width=device-width, initial-scale=1">

    <!--This is where you can input all the css files. The files are in Django format and following the path from the 'static' file -->
    <link href="{% static 'bootstrap/css/bootstrap-theme.css' %}"
          rel="stylesheet" media="screen">
    <!--You can add in a navigation bar here if it stays the same across all pages-->
  </head>

<div class="container">
{% block content %}
<!--No need to input anything here. This is where the body of your code will go from the other .html pages-->
{% endblock %}
</div>

<footer>
<!--Anything that repeats in your footer goes here-->
</footer>

<!--I input all of my javascript files at the end just in case the javascript doesn't execute then the page will still load-->
  <script src="{% static 'bootstrap/js/bootstrap.min.js' %}"></script>

<!--You can insert more javascript files here-->
</html>
Creating Extensions
When you create your first Django html page to add in content you’ll need to be sure to include two things:
- Loading the static files
- Extending the base.html
- Add your block content tag
Loading the static files will ensure that all of your images, css, and js that are in your static folders will show up on the new webpage. (*Note: If the images, css, and js aren’t in the static folder then the content will not load–see folder organization section above*). Extending the base.html file will ensure that elements of the page that stay the same across all pages such as a navigation bar or footer, also appear. The block content tag fills in where your empty block tags in the base.html file stop. Anything you add in between the block content tags on this new page will be specific to the page. Anything you add into the base.html file will apply across all pages. Here’s how you can set it up:
{% extends "NAME_OF_YOUR_PROJECT/base.html" %}
{% load static %}
{% block content %}
<!--Insert all of the page specific content here-->
{% endblock %}Updating Images and Links
One of the last parts you’ll need to do once you know the layout of where things should go on the site is updating the images and urls links between pages. Any image tags you have should be updated like the example below so they’ll show up:
<img id="teal" src="{% static 'img/teal_circle.png' %}" alt="teal circle">Any links that you’re making to look to other pages in the site will work following this format:
<a href="{% url 'index' %}">This is my index page!</a>The ‘index’ in the url is called from the model, so you’ll have to refer back to your model for the names of pages when updating the urls for the site.
Pull Content from database into Slider
One quick way to get content in your database displayed is through a slider. I used jQuery’s bxslider code for this example which can be found here.
For a quick explanation of the code below, I called the bxslider class from the code installed in the link above, and then called my classes. In this example, I had youtube videos in the database that were housed under my class ‘Media’. I took the iframe that you typically use when embedding a YouTube video into a site and replaced the source (src) link with a Django formatted one that reached into the database to pull out the videos. The ‘for’ loop in the code allows the videos to be clicked through (right and left), and the ‘if’ calls the correct media type I’m looking to pull from in my ‘Media’ class. Here is the code for a visual:
<ul class="bxslider">
 {% for medium in media %}
	<div class="item {% if forloop.first %} active      {%     endif %}">

{% if medium.mediaType == 'video' %}
		<li>
			<iframe width="640" height="360" src="{{medium.mediaLink}}" frameborder="0" allowfullscreen>
			</iframe>
		</li>

{% endif %}
</div>
{% endfor %}

</ul>Thanks!
If you found this post helpful or just extremely confusing, let us know either way by commenting below.
One thought on “Migrating From PHP to Django”