
This post is a follow-up to the introduction to the Field Notebook and the demo notebook, ‘Monumental Gifts’. I will go over how to install the app and start customizing your own web-based Field Notebook. This post will focus on how to start tailoring the models and appearance of your Notebook to suit your needs for your research. If you are interested (or discover later that you are interested) in building your own original application from scratch, I recommend working through the Beginner’s Tutorial on Django’s website. In fact, even if you don’t plan on building your own application, I still recommend the tutorial. You’ll have better understanding of how to modify and use your Field Notebook if you become familiar with how Django works as a framework.
Installing the app
To install this app, you will need to have installed both Python and Django. It will also require using your computer’s command line. (If you’ve never used the command line, check out the first lesson called ‘Navigation’ in this CodeAcademy tutorial for a quick crash course.)
Instructions for how to install Django can be found here on Django’s website. Instructions for where to get the latest version of Python can be found on the same page. If you don’t have Python installed already, you may want to get the latest version, but in case you’re wondering, I’m using Python 2.7.9 instead of Python 3.0.
You will also need a text editor (such as Sublime Text, Text Wrangler, Notepad++, etc.) set up if you don’t have one yet.
- The Field Notebook is available for download as a tar.gz file here. Click ‘View Raw’, then ‘Save File’ to download.
- Decide where you want your Field Notebook to ‘live’ on your computer. For example, if you decide you want it on your Desktop, drag the downloaded ‘django-field_notebook-0.1’ from your Downloads folder and drop it onto your Desktop.
- Once you have ‘django-field_notebook-0.1’ on your Desktop, navigate to the Desktop via the command line and start a new Django project on your Desktop. (See the section ‘Creating a Project’ in the first Django tutorial). Call your new project ‘field_notebook’. You should see the new directory appear on your Desktop.
- Open ‘django-field_notebook-0.1’, then open up the file ‘README.rst’ in your text editor. Carefully follow the instructions provided under ‘Quick Start’ through step 5. The instructions will tell you to open and alter code in source files that were automatically created within ‘field_notebook’. Open and alter them in your text editor. When you run ‘python manage.py migrate’ (step 5 in README), make sure you cd into the directory ‘field_notebook’ from the command line, otherwise the migrations won’t run and the database tables for your models won’t be generated.
- Open and read documentation.txt under the directory ‘documents’ in ‘django-field_notebook-0.1’. This will give you some background on how to run your development server locally. Try running it and see what your application looks like online at ‘http://127.0.0.1:8000/notebook’. If you see this in your browser…
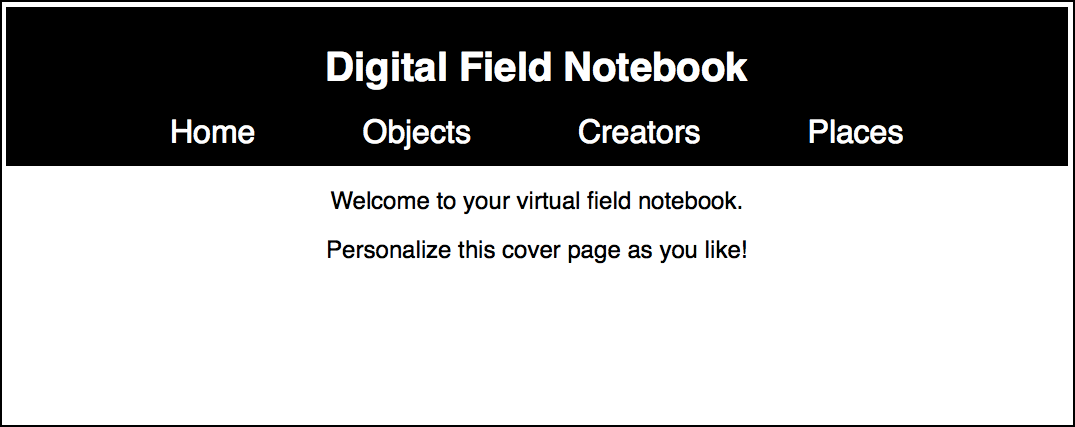
…you’ve installed the application!
Accessing the admin page for data entry
If you click around the navigation bar, you will see the pages on the Digital Field Notebook currently contain messages reporting that you haven’t entered any content yet. To start entering data, you will need to access the ‘back-end’ or the sqlite database that Django automatically generated for you. The interface for the back-end is the admin page.
While your development server is running, go to http://127.0.0.1:8000/admin. You will see a login page. To create a user name and password, you need to go through the command line again. Quit the server with CONTROL-C and type ‘python manage.py createsuperuser’. Follow the command line prompts, then run your development server again, and log into your admin account.
Once you’ve had the chance to explore the site administration interface, you can get started on customizing the admin by modifying the generic model names (Objects, Creators, Places) to fit your research context.
Modifying Models
One advantage of using Django is that you are free to make changes to an application’s models at any point in time. You will probably want to start with changing the models once you have installed the application and gained access to your admin site, before you start entering your field data.
One of the first (and easiest) things to do would be to change the class and variable names so that they make sense within the context of your project. Let’s have a look at the models currently in the application by opening up the file ‘models.py’ under the application’s directory ‘notebook’. (Note: if you click on the any of the screenshots of code below, you will be directed to the file in GitHub, if you would like to copy and paste any code from there. If you’ve downloaded ‘django-field_notebook-0.1’, you already have all these files though.)
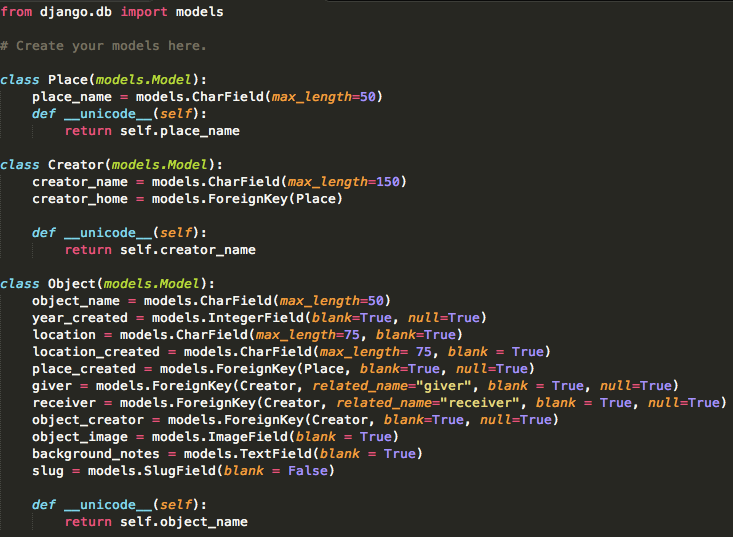 The classes defined here are Place, Creator, and Object. These generic class names point to the objects and entities. You can change the class names so they represent relevant categories for your research. For example, if you wanted to collect recipes by region and by people who created or published the recipes, you could open ‘models.py’ and change ‘Place’ to ‘Region’, ‘Creator’ to ‘Chef’, and ‘Object’ to ‘Recipe’. Once you do so, however, make sure that you change all other instances of the class names ‘Place’, ‘Creator’, and ‘Object’ in the document to those new names (i.e., where they appear as foreign keys).
The fields listed below each class name indicate object attributes and relationships among the objects and entities. These field names are also the fields that will appear in your admin page. You can delete and modify fields that appear in your admin site by modifying the fields in this file. You can also think of these fields as fields for entering metadata, or data about the objects, which will facilitate automated organization and retrieval of your Field Notebook’s content.
This is how my new Field Notebook models look with modifications: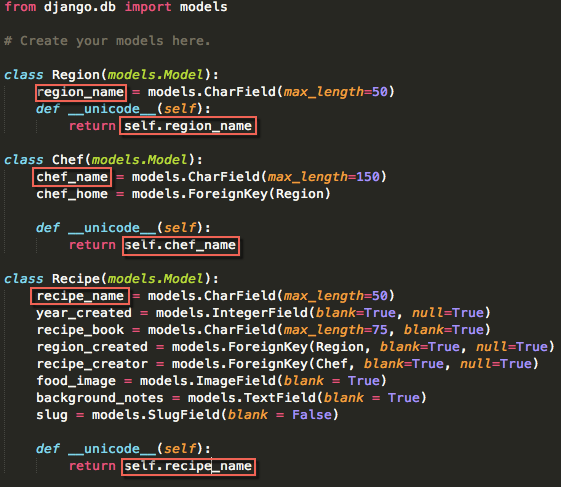
The red boxes around certain fields show that the ‘name’ fields for the classes also have to be changed under the functions for each class which determine the name that will appear when you use the Python shell to interact with Django’s API. The section ‘Playing with the API’ in this Django tutorial will explain further how this works.
If you want to change the existing structure of the models (beyond just changing their names), I recommend carefully reviewing this section of Django’s tutorials. You could always add more classes depending on your needs and the kind of data you’re collecting. Your ultimate goal is to model your data so that every entity relationship is clearly and unambiguously represented in your models. For example, looking at our three models above, even though every recipe is attributed to a chef, we don’t want to have to enter data about every chef twice (or more than twice, if multiple monuments were made by the same creator). Since we have a class called Chef, we can enter all our data about that chef once, then link related instances of the class Recipe to that chef. One thing to think about is the types of relationships you’re working with (are they one-to-one, many-to-one, one-to-many, etc.) in order to map how your models relate to each other.
Recipe has the most metadata as an object, because recipes are the focus of the research within our example’s context, just as monuments were the focus of ‘Monumental Gifts’. However, another important thing to consider with regard to your models and identifying your focus / main model is that if you delete entries in from another category that has a Foreign Key linking it to the main model (which in this case is Recipe) the recipe will be deleted from Django’s database as a ‘related item’. On the other hand, in the reverse case scenario, if you delete a recipe, the related chef and region will NOT be deleted from the system.
After you have decided on your new model names or taken away or added models as needed, it’s necessary to open up the ‘admin.py’ file your ‘notebook’ application directory and change the models that have been registered there.
Other sections of source code that you’ll need to adjust after changing your models in ‘models.py’ are ‘views.py’ and ‘urls.py’.
If you don’t modify the model names that appear in ‘views.py’, you’ll notice right away that the application interface is broken. Below is a screenshot of a section of ‘views.py’ with the some of the changes I had to make for the recipe Field Notebook example (this screenshot doesn’t show the whole file), with red boxes around the model names, field names, and principal changes in the source code so you can get the idea:
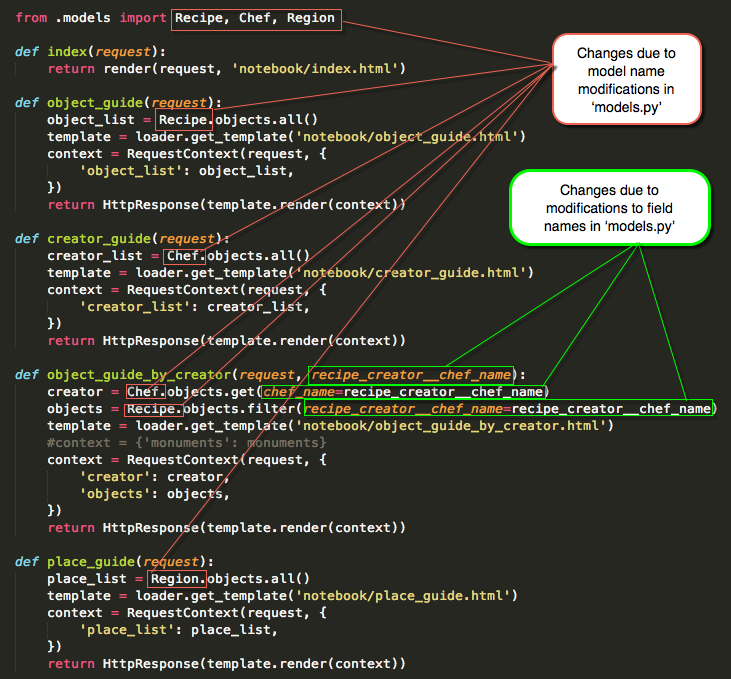
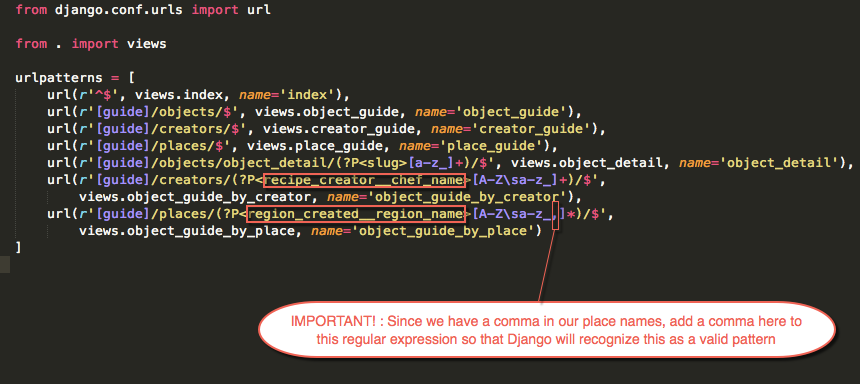
Once you’ve gone through the whole of ‘views.py’ and carefully changed all the generic labels to your new model names and field names, open ‘urls.py’ and make the following changes to the variable names in the URL confs (again inside red boxes) that correspond to the two views ‘object_guide_by_creator’ and ‘object_guide_by_place’:
We are also going to have to alter some of the code in the HTML templates to accommodate the changes to models.py, views.py, and urls.py, but we’ll address those in the section ‘Data Entry’ below once we’ve entered some data and start checking to see how it displays on the application interface.
Making Migrations to Save Your Model Modifications
Now that you’ve started making your changes to the models, you need to save your changes by making migrations. Making migrations is a two-step process:
1. In the command line, cd to the file directory where you have stored the site project files. Open the directory (unix command ‘ls‘) and then run the command ‘python manage.py makemigrations notebook’.
2. Once the migrations have been made, run ‘python manage.py migrate’ to update the tables in the sqlite database.
(Note: Between steps 1. and 2., you can optionally check for issues with the command ‘python manage.py check’ to see if there are any unresolved problems with the migrations.)
Perform this two-step process every time you modify the database tables through either ‘models.py’ or ‘admin.py’ so that those changes can be integrated into your application. Changes to the front end interface made in the HTML templates and ‘views.py’ or changes to the URL configurations in ‘urls.py’ don’t require migrations.
Data Entry
Let’s test our example Notebook for regional recipes by running the server and looking at the front end at http://127.0.0.1:8000/notebook/ . Nothing has changed on the front end. The names in the navigation bar won’t change until you modify the HTML templates in notebook/templates/notebook.
Now let’s look at http://127.0.0.1:8000/admin/ . Here the models shown have changed to our new names, and the new fields correspond to the changes we made in ‘models.py’.
Let’s add some data!
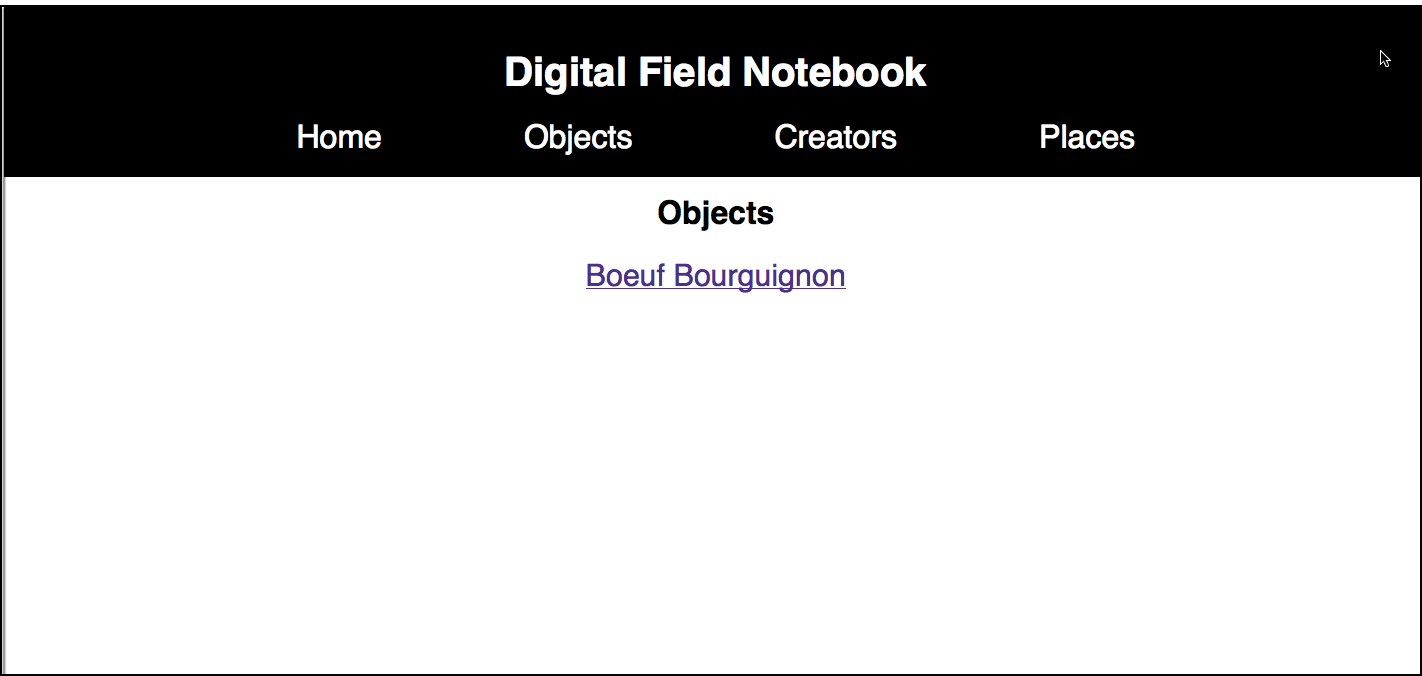
Let’s say the first recipe we want to enter is Julia Child’s Boeuf Bourguignon. You’ll notice the only required fields for Recipe are ‘recipe name‘ and ‘slug‘. The slug will be the text that is added at the end of URL that will direct you to the detail view of the entry for that object. It’s best to not leave any blank spaces in your slug; you can substitute underscores or hyphens (e.g., boeuf_bourguignon, boeuf-bourguignon).
We can also add ‘Julia Child’ as our chef (whose ‘chef home’ is ‘California, USA’), ‘Burgundy, France’ as the region of the recipe’s origin. To do so, however, we’ll have to hit the ‘plus’ sign next to those fields and make separate entries into the Region and Chef models. (In the app, the Creator and Place fields have been set as optional by default when entering data about an Object, but remember, once you enter a chef and region for the recipe here, if you later delete the entries for the chef or the region in the system, the recipe will be deleted with them).
When you go back http://127.0.0.1:8000/notebook now and navigate to a specific Object, you should now see the data you entered displayed on the interface.
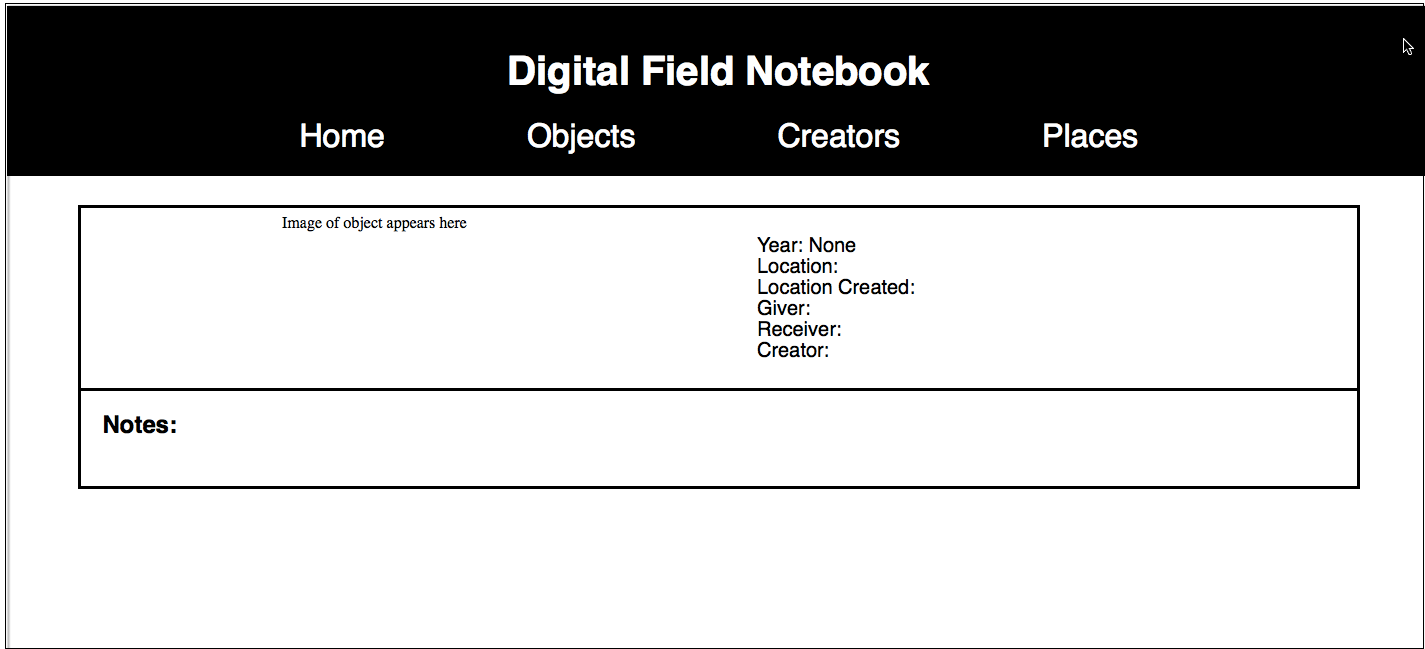
Click on Boeuf Bourguigon and Django should direct you to the object’s detail view, which if you’ve only entered what I have mentioned here so far, will still appear rather blank, but you’ll know it’s working:
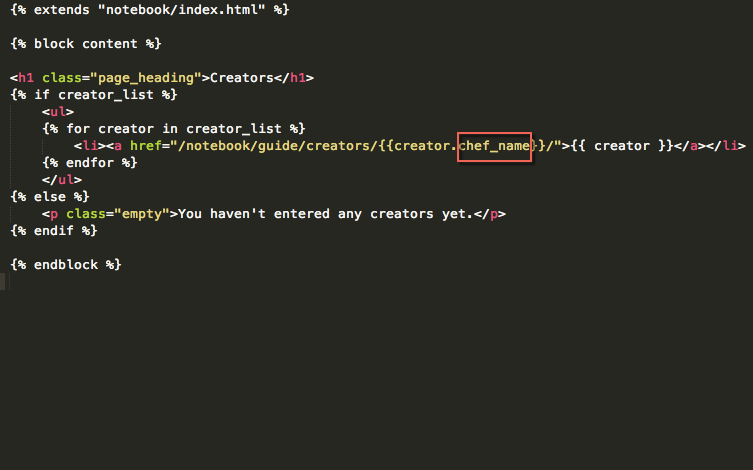
Now click on either Creators or Places in the navigation bar. You’ll see the data you entered appear on the new pages as links (‘Julia Childs’ should appear under Creators, and ‘California, USA’ and ‘Burgundy, France’ should appear under Places). Click on any of those three links and see what happens…the links are broken.
The fix for this is to modify the two HTML templates ‘creator_guide.html’ and ‘place_guide.html’ under notebook/templates/notebook in your notebook app. Open these up in your text editor and make the following changes:
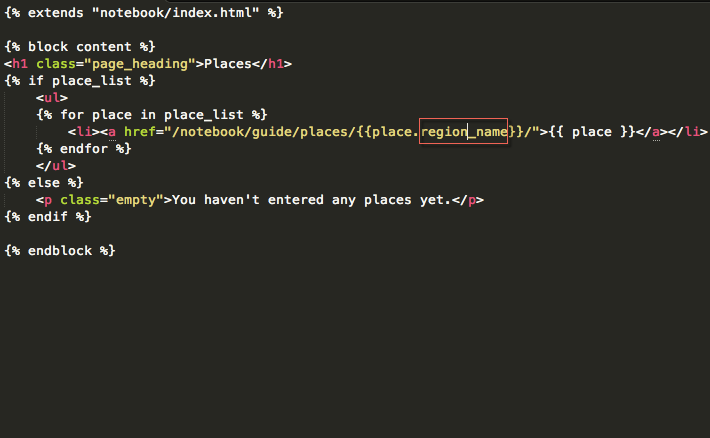
Now try out the links and see where they take you. If anything is still broken, review the changes above to make sure you have made all of them.
Customizing the Application Interface
If you’re not too tired of modifying source code at this point, you may be wishing the interface labels actually corresponded to the categories of your research project. The good news is, you’re already past the hardest part of the customization, which was changing the models and all the source code affected by the models. To change the labels on the interface, all you need to do is alter the text in the HTML templates. Changing the templates requires no migrations: just save your changes to the HTML files, then refresh the page in your browser.
First, go into notebook/templates/notebook/index.html. Locate the <header> tag and change the text of the links in the navigation bar to match the names of your new categories:
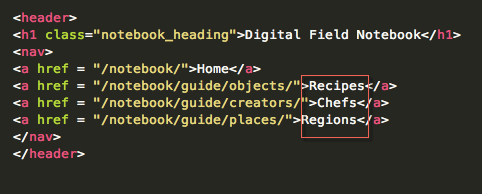 Now check your application interface at http://127.0.0.1:8000/notebook (if it hasn’t changed, refresh the page in your browser).
To change headings on other views, it’s now just a matter of going into the corresponding templates and changing the text in the <h1> tags as you see fit. All the templates for the application interface can be found in the notebook/templates/notebook directory. If you want to further customize your landing page, you could go inside the <div> under the class named ‘intro’ in ‘index.html’ and modify the welcome text to perhaps include your name and an introduction to your data collection.
Parting Words
We’ve just covered how to install the Field Notebook, modify models, set up an admin account, and modify labels in the interface.
Don’t be discouraged by all the details if you’re new to Django. Our team found it takes some time to learn, but the returns will be worth your time. We’ve done our best at the Digital Projects Studio to get most of the preliminary programming out of the way for you, so you can start entering data and using the Field Notebook as soon as possible. Our hope is that using and setting up this app will serve as a friendly intro to Django’s framework too. Good luck on your Django journey, and feel free to share feedback with us in the comments.
2 thoughts on “Customizing Applications in Django”