
Two of us here in the Digital Project Studio have recently been working through an R script developed for a workshop on doing some basic mapping in R. The goal was to turn the script, which was used alongside in-person instruction, into a usable self-directed tutorial. To do this we used R Markdown, an authoring platform that turns R scripts into reproducible and dynamic documents, presentations, and webpages. Our introductory tutorial will get you set up and started to using R Markdown. On this post we’ll share some of the additional features we’ve learned using this platform.
To find the actual R mapping workshop we created, the instructions and file downloads are accessible here: http://clarkdatalabs.github.io/mapping_R/
In the zipped file package you can find our R Markdown file for creating the instructions of the workshop: script_markup.Rmd
Knitting Documents
Once you’ve followed our previous tutorial to set up knitr, knitting documents is simple. Edit the header of your page to include the output document types desired:
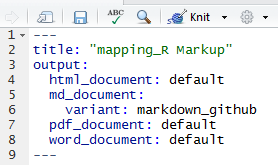
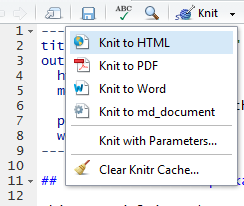
Here we’re ready to output html pages, pdf and Word documents, and a .md document used by GitHub to display markup. Once you’ve updated the heading, R-Studio will allow you to knit any of the listed documents:
Chunk Options
A basic unit of code in R Markdown is called a code chunk, and looks like the following:
```{r, option1=TRUE/FALSE, option2=TRUE/FALSE}  #Start code
Write code here
``` #End of code
Knitr processes these code chunks and creates an output based on the options selected. Examples of the chunk options used for creating the Mapping R tutorial follow. For in depth discussion of available chunk options and general reference on knitr, visit Yihui Xie’s excellent reference page.
```{r, include=FALSE}
api.key.install("...")
```
By default the include option is TRUE. Setting it to FALSE instructs knitr to ignore the entire code chunk when running. In our mapping tutorial, the user has to register to receive an API key to access some of the functions. Including our own API key installation in the instructions would be confusing.
```{r, message=FALSE, warning=FALSE}
library(acs)
library(choroplethr)
```
Setting the message and warning options to FALSE tells knitr to run the R code while knitting, but not to include any messages or warnings that are displayed in the console. For example, loading the above libraries without these options (default = TRUE) yields:

```{r, eval=FALSE}
counties <- readShapeSpatial(file.choose(),proj4string=CRS("+proj=longlat +datum=WGS84"))
```
Setting eval to FALSE tells knitr to display the R code but not evaluate it. Typically you would be making an R Markdown document that runs all of the code and generates plots and figures every time you run knit it. This is the core strength of using R Markdown to generate documents: figures are dynamically generated, so if your data change, you only need to re-knit the document to update all the dependent figures. For creating our tutorial however, we used several user prompting functions (file.choose()) which made dynamically producing all of our plots cumbersome. Instead, we saved the figures to display and didn’t evaluate much of the code when generating an output.
```{r, tidy=TRUE}
Install.packages(c("acs","choroplethr","choroplethrMaps","maptools","rgeos","mapproj","RColorBrewer","maps","geosphere","rgdal","reshape","ggplot2")
```
In these previous two examples you may be seeing a side scrolling box for the code chunk. Annoying, isn’t it? To force text wrapping in your output html document, use the tidy = TRUE option.
Setting Global Chunk Options
```{r global_options, include=FALSE}
knitr::opts_chunk$set(tidy = TRUE, fig.align='center')
```
To set the default chunk options, paste the above code chunk at the top of your document and substitute in the option defaults you want to set for the red text.
One thought on “Creating R Tutorials Using RMarkdown: Code Chunk Options”